

Do you ever need Hebrew characters mixed with your English text? Here is a method I use to easily insert Hebrew letters and vowels into a document.
I have been working on a project that requires a combination of Hebrew and English (Latin) fonts in the text. My Word document needs to have a line of Hebrew, then a line of transliterated Hebrew, then a line of English. I’ve tried various ways of integrating the Hebrew characters, including vowel points, into the body of the text but always encountered problems. One method seemed to produce a nice result but couldn’t be entered right-to-left, so I had to type everything in backwards. Often the vowel points didn’t adjust properly for the different sized letters. And wrapping the end of a long line was always very difficult.
Then I discovered that the fonts I was already using in my documents had Hebrew characters as part of the set. After some experimenting – and a lot of trial and error – I learned how to find them and use them in my documents. I will share with you what I have learned. If you have additional suggestions or better methods, please leave a comment. This is what works for me, and I am continually learning.
I will be describing my method using Microsoft Word in Windows 10. This works consistently throughout Microsoft Office programs for Windows 10 and Windows 7. I’ve tested it in Word, Excel, PowerPoint, OneNote, Outlook and Publisher. It also works in the free open-source Libre Office Writer for Windows 10. I’ve also used it in Libre Office Writer for Linux and the procedure was very similar to the Windows programs. If you use the web-based Google Docs, the steps are similar but not exactly the same. I did not get this to work in the web-based version of Microsoft Word.
Internet browsers behave differently and may not display exactly the same thing from computer to computer, so in this article I will rely on images rather than text when necessary. The same goes for apps on phones and tablets and some Windows apps such as Yahoo Mail. Sometimes when the browser or program does not support Hebrew text, you may see a series of boxes or question marks. And since I no longer own any Apple products, I can’t tell you how those may work.
For this demonstration, we will consider two font styles – Arial and Times New Roman. Times New Roman is a serif typeface. A “serif” is a small stroke usually attached to the end of a larger stroke when writing. This is an example of Times New Roman, a serif typeface:
![]()
Arial is a sans-serif typeface, meaning it does not have serifs. This is an example of Arial, a sans-serif typeface:
![]()
Both of these fonts include Hebrew characters, though they look very different. Times New Roman has serifs, and Arial does not.
Here is the word shalom using Hebrew characters in the Times New Roman serif typeface:

Here is the word shalom using Hebrew characters in the Arial sans-serif typeface:
![]()
How to Insert Hebrew Characters in Microsoft Word
First, open a new Word document. Use whatever font you normally use to type a few words in English. Hit <Enter> to move to a new line.
Next, from the menu bar select Insert, then select Symbol from the ribbon. open the drop-down menu, then choose More Symbols.
In the dialog box that opens, first select the Font: Times New Roman. The select the Subset: Hebrew. Scroll down three or four lines until you see Hebrew characters. If you do not see the Subset menu, make sure the box in the lower right corner is set to from: Unicode (hex). Your dialog box should look similar to this:
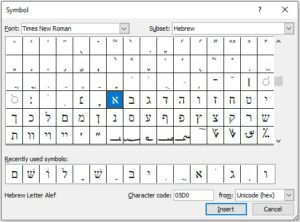
Click once on the alef character, the one I have selected in this image – you may have to scroll down a bit to find it. You will notice that the lower left corner of the dialog box says “Hebrew Letter Alef.” You can use this to make sure you have selected the correct character, which will become more important later. If you click on the <Insert> button, the alef will appear in your document. Move the dialog box if necessary to see it.
Directly above the alef (at least in my dialog box) is the vowel point qamats. Click on it once and the lower left corner of the dialog box should tell you that you have selected “Hebrew Point Qamats.” Click on <Insert> and the vowel point will be placed in your document directly below the alef.
You may notice that the blinking cursor, indicating where the next letter will be placed, is to the right of the alef and qamats. This is because you are still writing with standard English (Latin) characters from the keyboard. You have inserted special characters – Hebrew letters – into the text.
Now, in the dialog box, select the letter bet (right next to the alef). The lower left corner of the dialog box will confirm that you have the correct letter. Click <Insert> and the bet will be placed to the left of the alef and qamats. Word knows that Hebrew reads right-to-left and inserts the characters this way.
You have just created the Hebrew word אָב av, or “father,” in your document.
The Hebrew letters are pretty straightforward, and you may notice that the final letters are also included. The vowel points, however, are not quite as simple. For example, to the left of the alef in the dialog box is something that looks like a qamats but is called “Hebrew Point Qamats Qatan” or “little qamats.” The difference is in the way the vowel point is placed in different letters. So checking the names in the lower left corner can be very helpful in making certain you have selected the right character. Using the correct qamats puts it in the proper location below a wider letter such as a shin or a narrow letter such as a nun, and slightly to the right in the case of a dalet or resh. It also correctly locates it in the final kaf.
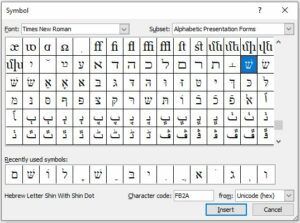
You can construct more complex characters using the plain letters and special markings, such as the dagesh, shin dot, sin dot, holam for vav, etc., but almost everything you need is already created for you as a single character. You have to scroll down further to find them, though.
Toward the bottom of all the Symbol subsets is a section marked as Alphabetic Special Characters. You can scroll down to it, or select it from the Subset menu. In this collection of characters you will find letters with a dagesh ready to use, along with the sin and shin, vav holam, and other variations. The dialog box for these letters looks like this:
Some Concluding Thoughts
Here are a couple of final thoughts that make things go a little easier. The most recently used characters appear at the bottom of the dialog box, so you can get to them a little quicker. Also, you don’t have to use the <Insert> button – you can double-click a character either in the full character list or in the recently used list and it will insert into the text. Always insert the Hebrew letter first, then the vowel, accent or other mark as needed. Play around with it a little, learn how this dialog box behaves, and discover the most efficient way for you to use it.
This certainly isn’t a fast way to type in Hebrew, but that wasn’t my goal. As someone not fluent in the language I have to stop and think about every letter and word anyway. I am a touch-typist in English, not Hebrew. And this is particularly useful because I need to have both the English (Latin) and Hebrew character sets in the same document. For documents I want to pass on to someone else, I usually save them as a PDF so that I know the font will not change.
If this has been helpful to you or you have additional suggestions, please comment below. Meanwhile, I have several old documents in which I want to now go back to and add Hebrew characters using this method.
Thank you. Very helpful. You may find it quicker (after a bit of preparatory work) to enter the unicode which is in the Character Code box [at the bottom, second in from the right]. The preparation needed, is to make up a table of all the letters and vowel points with their associated unicode. From this table, simply type the 4 digit or character code then press Alt +X and it will enter the symbol. It’s still a long winded method of typing a single symbol or letter but it’s far quicker than opening the
Insert/Symbol/More Symbols route and then selecting the font and sub-set AND scrolling down the dialogue tables. That’s several operational steps even if you use the keyboard short cuts
Why don’t you just install a Hebrew keyboard, which would let you type your Hebrew characters in whatever font you’re using at the time? No need to insert every character manually.
Thank you for the suggestion. The method I described is not too cumbersome for an occasional Hebrew word here or there but is time consuming when extensive Hebrew is desired. I did install the Hebrew language and keyboard in Windows. However, I did not find the vowel pointing I needed, which is available in the method I described. If you have more information about this, I would welcome the input. You can reply here or contact me directly.
I do appreciate your site!
As an FYI, character map,,,, has a lot of fonts, and several have Hebrew fonts, I really like the Ezra SIL שולם